Finally, here it is, the promised How to paint Necron Deathmarks. I've teased this article for some time now, especially with this article here. Games Workshop developed some beautiful new models when they relaunched their Necrons, the deathmarks are among them. The cyclopean look, the long rifles and the menacing poses you can create with the kit are great. To top it off, I think Necrons are really easy and a joy to paint. So let's get to part one of this How to.
The intention for these was to make them look similar to my version of Imotekh, that I showed here. That's where I had tested most of the colour combinations before, with good results.
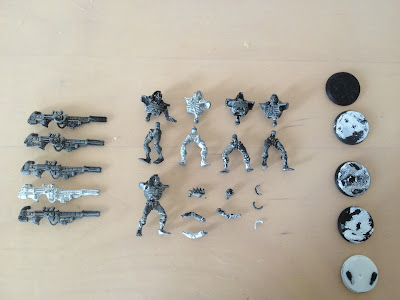
There's numerous ways to go about painting Necrons, the easiest being the use of a metallic primer like the one provided by Army Painter. Didn't have it on hand, so I had to do it myself. But before I started out, the poor fellows looked like this:
 |
| Necrodermis epic fail |
Priming
I think I've said it before, but there's no harm in repeating it: when you are going to paint metallic colours, you want a black layer of colour underneath it. Metallics look somehow wrong when painted on a white undercoat. Therefore, the deathmarks were primed by using Games Workshop Chaos Black Primer.
Basecoating
As I said, you can shorten the amount of time you need for this with coloured primer, but I did it by hand.
- Silver Metals: A mix of Games Workshop (GW) Boltgun Metal with a tiny bit of GW Adeptus Battlegrey was used as a metallic basecoat (90/10 ratio). I mixed the latter in to get the basecoat to cover faster and dull the metal a tiny bit.
- Gold Metals: same as the mixture on the Raven Guard Chaplain: GW Dwarfen Bronze mixed with P3 Umbral Umber in a 70/30 ratio.
- Black armour: P3 Coal black mixed with a bit of GW Adeptus Battlegrey and GW Chaos Black will get you an almost black, but little bit lighter basecoat from which to work up and down in tones (60/30/10).
I ended up with them looking like this:
 |
| Necrodermis regenerating... |
A lot better than the sad state they were in before they were primed. Still, while painting I discovered that on a lot of areas where I was unable to clean all of the miniature, I ended up with rough surfaces due to the thickness of the failed priming. But I've already come up with an idea for that. I'll have to see, if I can make it work at a later stage, though.
Shading:
For Shading, these fellows are really simple. As with the chaplain in my previous posts, the technique requires you to work from top to bottom. Always drag your brush downwards. You need to pull any excess wash into the ridges around the joints, where you want more definition and shadows.
- Metals: P3 Armour Wash (great wash all around, try to get a hold of a bottle) was used for the first layer, then a mix of GW Badab Black with a dot of P3 Exile Blue added in was used for the second wash layer. As with the chaplain How to, let each layer of wash dry completely, before applying the next one and don't let the wash pool but in the joint sections. Layer 3 consisted of pure GW Badab Black around the joints and the lower parts of the mini, where I thought additional definition was needed.
- Black armour: I started with a layer of thinned down GW Chaos Black, then thought I needed to tone it down a bit more. So I went the pure GW Badab Black route, as well, and gave the lower thirds of all armour sections a quick dab to darken them.
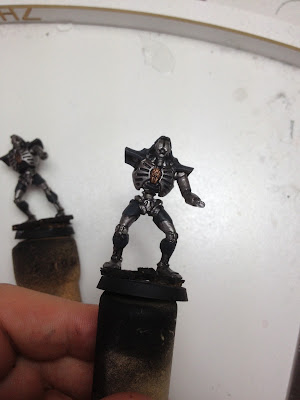
The results of the shading:
 |
| This would be almost enough for basic tabletop quality |
Next up - the Highlight Steps, followed by the OSL needed to add the cherry on top. So stay tuned.
Did you like this How To? Do you want me to explain certain things in more detail? Let me know in the comments below.
Cheers,
Kenza


No comments:
Post a Comment